Pages

Tuesday, June 30, 2015

Fairy Doors and Gnome Doors (#2)

After making a fairy door out of sticks and hiding it in our neighbor's garden last Summer, L and I thought we'd spread the fairy love a little farther this year...we've been making FAIRY DOORS and GNOME DOORS and hiding them all around town! It's so much fun surprising the young and the old -- just imagine the look on anyone's face when they're out in the garden and suddenly discover a teeny, tiny door that wasn't there before. Ha! These fairy doors are so simple to make and all you need is rocks, paint and clear sealant (which is optional). To draw a little more attention to the fairy doors, we like to leave a tiny button or painted rock trail as well. 


Materials needed:
-medium-sized rocks
-acrylic paints
-clear sealant spray (optional)

After cleaning any dirt off your rock, start by painting on a door. 


Next, add some windows, if you have room.


If adding any glitter paint, apply that next. We like to paint a little glitter over our windows.


Next, outline the door and windows carefully with black paint. Add a doorknob as well. 


Now for my favorite part, paint connecting black lines on the rock, resembling a stone wall.


If you'd like to add a flower pot or lil window box, add one now.


Finally, finish with some green vines, leaves, and flower details. 


Once all your paint is dry, you can spray the rocks with a coat of clear sealant to make the fairy doors even more weather resistant. Permanent paint usually doesn't wash away, but I always like to add a coat of sealant just in case.


Now for the real fun...time to hide your fairy doors and gnome doors. (Gnome doors go on trees, generally speaking.) 


I like making some of our fairy doors to resemble our neighbor's front porches and gardens...


Enjoy!!!


See also this DIY for fairy furniture!


Wednesday, June 17, 2015

Fizzy Ice Chalk Fun

After we made "Homemade Sidewalk Chalk" the other day, I couldn't wait to make some FIZZY ICE CHALK as well! I looked around online and found all kinds of recipes and methods for ice-chalk and fizzy or erupting ice-chalk. L and I experimented and tried all the tricks...we added some of our own variations, and I'm happy to share those that worked best! I suggest making FIZZY ICE CHALK in the morning on a hot summer day, let it set-up for a few hours, and bring it outside to play with in the afternoon. We have a few batches sitting in our freezer right now, just waiting for a lull in the action so we can bring it outside to play with again. This time we made lots so there'd be plenty for the neighborhood kids to play with as well! We can't wait!


Materials needed:
-1/2 cup cornstarch
-1/2 cup baking soda
-food coloring (or tempera paint)
-1 cup water
-measuring cup
-silicone molds (or ice tray)
-spoon
-toothpicks
-vinegar
-spray bottle, squirt bottle, or infant medicine dropper


Using a measuring cup, combine 1/2 cup cornstarch with 1/2 cup baking soda. Mix together with a fork or spoon.


Add 1 cup water and mix gently, but thoroughly. 


Next, carefully pour your mixture into the silicone molds or into your ice tray. If you don't have either available, you could use paper cups as well!


Add a few drops of food coloring or a squirt of tempera paint to each mold. (We tried both...the food coloring mixed better, but both worked fine!)


Using toothpicks, carefully mix each color. 


Put the molds into the freezer for a few hours, til they set-up completely.


Before bringing the ice chalk out to play with, prepare your vinegar. You can put it into spray bottles, into squirt bottles (empty dish soap bottles work great), or pour the vinegar into small cups paired with a medicine dropper. All are great for little hands and developing motor skills...L's favorite is the medicine dropper method!


After the ice chalk is thoroughly frozen, bring it outside to play! One page online suggested painting the sidewalk first with water...we tried it, but didn't see much benefit in having the pavement wet. We had more fun coloring with the chalk on dry pavement! Experiment with it though...see what works for you! 


After the kids are finished coloring (if they can wait that long!), it's time to bring out the vinegar. Spray or squirt the vinegar onto the ice-chalk and the ice-chalk pictures to watch it sizzle, fizz and erupt! This is definitely everyone's favorite part! 


Take a moment to talk to your kids about chemical reactions and the result of a base (the baking soda) and an acid (the vinegar) coming together. L always likes to taste how salty the baking soda is compared to the sour smell of the vinegar. Summer science fun...I just love it! Enjoy!!!

Sunday, June 14, 2015

Homemade Sidewalk Chalk

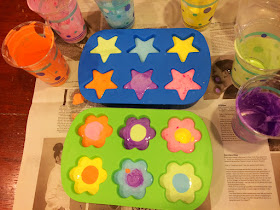
Making SIDEWALK CHALK is so fun and easy, I doubt we'll ever buy it from a store again! I've seen multiple DIYs on making chalk, but they all seem to use toilet paper rolls lined with wax paper or foil...some big complicated mess. I decided to use our silicone molds (the ones we only use for crafts) and the chalk popped out easily, plus it took on some fun and funky shapes! HOMEMADE SIDEWALK CHALK can be made in less than 10 minutes, but it takes 2-3 days to set completely...so give yourself plenty of time!


Materials needed:
-Plaster of Paris
-tempera paints
-water
-silicone molds
-paper or plastic cups
-plastic spoons or craft sticks


First, protect your working area with some newspaper.

The recipe for sidewalk chalk is pretty simple: 50% plaster of paris, 50% liquid (water + paint).
You can measure it out precisely: 1 cup plaster, 3/4 cup water, 1/4 cup paint; or you can do what we did and just "eye ball" it. 

Fill up your disposable cups about halfway with plaster.
Add a good squirt of paint. 


Then add water. And mix. 


Once you have all your chalk mixed up, carefully pour it into the silicone molds. 


If you want to mix colors, making a funky tie-dye effect, fill your mold about halfway with one color. Then carefully pour other colors on top. 


Set your sidewalk chalk aside for a full day to dry. I suggest placing it near an air vent in your house to speed up the process. 


After a day has passed and the chalk looks dry, gently flip the molds over and release the chalk onto some wax paper. (If the chalk is still moist, you can try drying the chalk with a hair dryer too.) 


Once the chalk has been removed from the molds, put it aside for another day or two for the chalk to set-up and dry completely. (As you can see, our yellow mixture may have been a little too moist on our first try...it was still sticky when we took it out of the molds. We let the yellow dry for a day longer than the rest, and it colored just fine!)


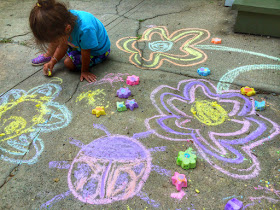
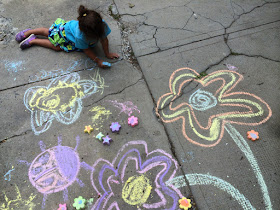
Now, time to play!!! Aren't the colors beautiful? Brighter than any sidewalk chalk I've ever seen! 


Enjoy!!!