Showing posts with label nature crafts. Show all posts

Wednesday, September 2, 2015

DIY Toy Sail Boat

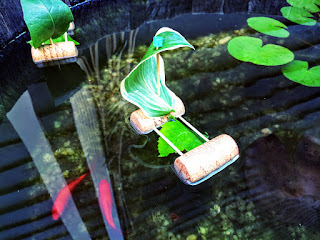
One evening this summer, while we were getting ready for bath time, L pulled a wine cork out of her pocket. She had been saving it all day to float it around and play with in the bath tub. That got me thinking...I knew with a few toothpicks and some leaves we could turn her wine cork into a little sail boat! Leaves work great for this project, because they're naturally water-proof and easily replaceable! 


Materials needed:
-2 wine corks
-4 toothpicks
-2 leaves
-old pencil
-scissors


Take one of the wine corks and stick three toothpicks into it, all pointing in the same direction in a line.


Next, push the second wine cork into the opposite ends of the toothpicks. 


Stick one more toothpick vertically into the middle of one of the corks. 


Find a medium-sized leaf and weave it through the bottom toothpicks. We used a balloon flower leaf. This step isn't necessary, but it makes a nice lil bed for anything you may want to sail on top...a bug, a rock, a fairy friend.


Next, find a slightly larger leaf and thread it onto the vertical toothpick, making a sail. We found the hosta leaves to work best for this, though any thick and sturdy leaf will do! 


To make the sail boat safer for little hands, twist an eraser off the top of an old pencil. Cut it in half with scissors and push it onto the top of the sail. 


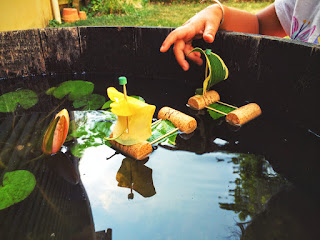
Now, time to play! L had hours of fun blowing her boats around our rain barrel! 


The boats may not seem like much, but ours withstood some submarine plunges under the water and lasted through two nights of bath time play! Tomorrow, we'll replace the leaves and keep sailing!


Enjoy!!!

Saturday, August 15, 2015

Craft Stick Fairy Doors

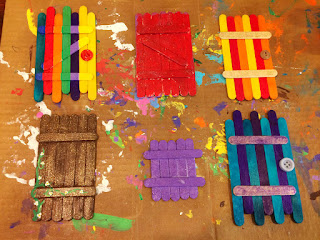
It's no secret that we LOVE making fairy/gnome things at Our Beautifully Messy House...fairy houses, fairy furniture, fairy doors, gnome doors, flower fairies, fairy folk...need I go on? We just can't help it! What I love the most about making fairy doors and gnome doors is surprising people with them! L and I made an abundance of CRAFT STICK FAIRY DOORS this week as we prepare to spread them around the neighborhood. Of course we enjoy surprising our friends and close neighbors, but what I really love is putting them on strangers' front porches and sneaking them into their gardens! We rarely get to see people discover the fairy and gnome doors, but the surprise, the magic in it all makes L and I giggle for days! We've had a great time making these craft stick fairy doors...aren't they the cutest!?!


Materials needed:
-crafts sticks (big, small, colored, any or all)
-wood glue
-Q-tips
-buttons


Optional materials:
-acrylic paint
-sealant spray
-wire & nails


First, lay out your craft sticks in a door shape. If you have colored sticks, your kids will enjoy playing with patterns! 


Using a Q-tip, put wood glue onto a small craft stick and carefully lay it across your door. If you don't have small craft sticks, you can always cut a normal-sized one in half! It's best to put at least 2 sticks across, but you can play with the angles and directions that you put them. Remember, fairy doors don't have to be perfect!


If you don't plan to paint your door, you can glue a button-handle on now too!


After the glue has dried a good bit, flip your doors over and smear wood glue all across the back for extra support. Let them dry for a few hours or overnight.


Next, if your craft sticks are plain and you want to, paint the doors. We especially like to add glitter paint to ours...helps the fairies and gnomes find the doors of course.


After the paint has dried, glue on button-handles if you have not done so yet. We like to spray our doors with some acrylic sealant as well...makes the wood a little more durable outdoors and gives them a more finished look.


Now for the fun part, hide them around town...or give them to friends! These would make an adorable party favor for both kids and adults! Enjoy!!!


Other posts you may like:


Sunday, July 12, 2015

DIY Citrus Stamps

How cute are these DIY CITRUS STAMPS we made this week? They really were simple to make and the outcome is adorable...perfect for Summer! L and I stamped t-shirts, tea towels, and a pillow case for her bed. Just think of the possibilities... You could use this stamping technique to brighten-up party invitations, gift bags, skirts, shorts, a tablecloth, shower curtain...the possibilities are endless (and sweet)! 


Materials needed:
-an orange, lemon, & lime
-tea towels, t-shirts, etc.
-knife
-acrylic or fabric paints
-flat, plastic lids or plates
-paper towels
-parchment paper


If you need to, iron your tea towels or t-shirts first! Protect your work area with parchment paper. (Usually I use cardboard or old newspapers for projects, but with this one I didn't want the texture of the cardboard to effect the stamping and I didn't want newspaper to discolor my cloth. Parchment paper was perfect!)


Next, cut your orange, lemon and lime in half with a sharp knife. If you like to, cut a little "handle" in each fruit half...makes stamping easier, especially for kids!


Turn the fruit over onto a paper towel, to soak up some of the juice from the fruits.


Next, squirt your paints onto plastic lids or plates.


Dip the sliced fruit into the paint. Blot it onto a paper towel, if there appears to be too much paint.


And press the fruit gently onto your cloth. Too easy, right!?


We experimented and made some of our tea towels patterned, while others we stamped randomly. The random was definitely our favorite...a little more carefree, like all things "summer" should be!


If you have some prints that are more solid looking (a bit too much paint), don't fret...just overlap another fruit in another color on top! It will look like you planned it that way all along!


Instead of stamping an entire tablecloth, you can just stamp tea towels and overlap them as we did here. Looks great on their own or with a solid tablecloth underneath!


Too cute, huh!?! Enjoy!!!