Showing posts with label Christmas. Show all posts

Sunday, February 15, 2015

DIY Chocolate Orange Sugar Scrub

As we move towards Spring, I keep thinking of citrus, lemon-blueberry muffins, lemonade and sunshine! Unfortunately though, we're not quite there yet...wind chills today in the negative digits! I think it was 4 degrees out when we woke up this morning! Brrr... And let me tell you, this cold weather is not helping the chocolate addiction I acquired over the holidays. So with all that stirring around inside of me, I dreamed up this CHOCOLATE ORANGE SUGAR SCRUB and it is divine!!! Just what I needed today! This would be great to use in the bath or shower!


Ingredients:
1 cup white sugar
1/2 cup brown sugar
2 Tbsp cocoa powder
3 Tbsp olive oil (almond oil or coconut oil)
~15 drops (1/2 tsp) Sweet Orange oil
1-2 tsp orange zest (optional)


First, mix together the sugars with a fork. If your brown sugar is clumpy, try to mix until most of the clumps are gone.


Mix in the 2 Tbsp of cocoa powder.


Next, stir in the olive oil one Tbsp at a time. Some olive oils are pretty potent...if you have almond or coconut oil on hand you can certainly substitute that for the olive oil. I'm all about using what I already have though...and it turned out great!


Once the olive oil is added, stir in some Sweet Orange Oil. (I found mine in the organics section of our grocery store.) To really bring the aroma up a notch, add about 2 tsp of orange zest to the scrub! Now it is certainly good enough to eat, but even better to exfoliate your skin with in the bathtub! The sugars will scrub away any dry, dead skin and the oil will leave you with just the right amount of moisture. 


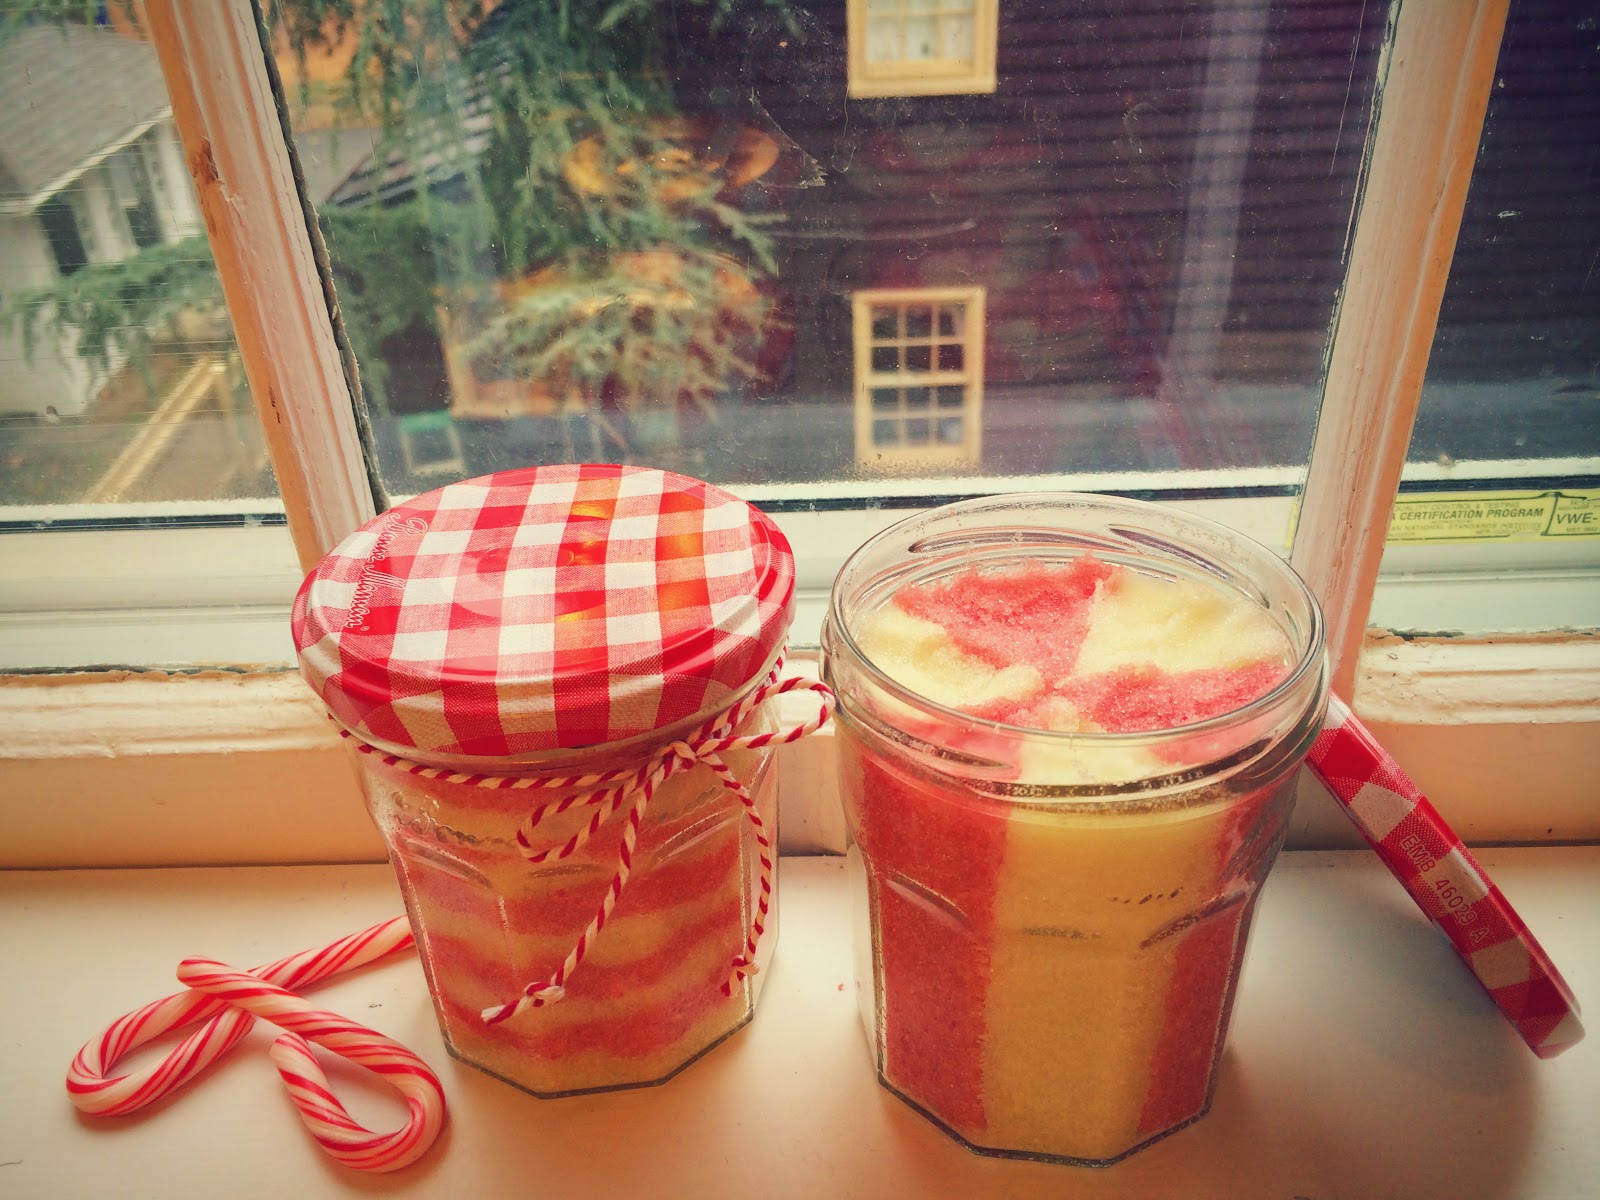
Spoon your concoction into 2 jars...one for you and one for a friend! Enjoy!!!


Friday, January 9, 2015

Giant Ice Marbles

How cool are these GIANT ICE MARBLES!? I'd seen pictures of something similar before, but never a "how-to" on making them. Figuring it couldn't be too hard to do, we gave it a try! There is definitely a list of things not to do we quickly found out. Haha! Hopefully I can help you avoid such mistakes! These GIANT ICE MARBLES are just beautiful in the snow!


Materials needed:
-regular sized balloons
-food coloring
-warm water
-below freezing temps

First, put 5-10 drops of food coloring in a balloon. Next, fill with warm water and tie off with a knot. Do not try putting food coloring in last...your hands may become dyed blue for a day or two if you do. Make sure to use warm water instead of cold...it helps the coloring spread evenly around the entire balloon. If you fill the balloon to only mid-capacity it will help make the marble round as a ball. Before tying the knot, very carefully let any air residing just above the water line out of the balloon...simply do this by loosening your grip on the mouth of the balloon until a bit of water starts to leak out. 


Now, it's time to put the balloon outside. Placing the balloon partially on its side (like the balloon pictured on the far right) and in snow is best...helps it keep a nice round shape rather than flattening out. 


Leave the water-filled balloon outside in below freezing temps for 36 to 48 hours. Even if the temperature is in the single digits, one night is not enough for the entire balloon to freeze. As you can see with this one, the water in the center will flow right out. 


Finally, after the water is completely frozen, cut and remove the balloon from your GIANT ICE MARBLE. Beautiful!!!


Monday, December 22, 2014

Magical Fantastical Christmas Fudge

This MAGICAL FANTASTICAL CHRISTMAS FUDGE is always a favorite among my friends and family...I make it every year! It's quick and easy to make, looks beautiful, tastes divine, and the kids love to help with this one! The recipe is adapted from the "Sweet Dreams Chocolate Fudge" recipe by Max Brenner...we like to leave out the nuts and add some candy cane dust instead! 


Ingredients:
1 (7 oz) jar marshmallow cream (clouds)
1 1/2 cups white sugar (princess diamonds)
2/3 cup evaporated milk (mountain snow)
1/4 cup butter (candy bricks)
1/4 tsp salt (the lost sea)
3 cups milk chocolate chips (from the milky way)
1-2 crushed candy canes (from Candy Cane Forest at the North Pole)
1 tsp vanilla extract (from a magical island)

Line an 8x8in pan with aluminum foil. Set aside.

In a large saucepan over med-low heat (on a scale of 10, put the stove on 4), combine the CLOUDS, PRINCESS DIAMONDS, MOUNTAIN SNOW, CANDY BRICKS and the LOST SEA. Bring to a boil, stirring constantly for 5-10 minutes. You don't want the mixture to burn, but you do want the sugar to be good and melted so the fudge isn't gritty...that's why I turn the heat down to just below medium and stir, stir, stir!!!

Turn the heat off and pour in the CHOCOLATE CHIPS FROM THE MILKY WAY. Stir until chocolate is melted and mixture is smooth. Stir in the VANILLA FROM THE MAGICAL ISLAND and 1-2 tsp of crushed CANDY CANES FROM THE CANDY FOREST. 

Pour into prepared pan. Sprinkle remaining CANDY CANE DUST on top. Chill in refrigerator for 2 hours or until firm. Lift the fudge out of the pan, holding onto the foil and place on a cutting board. Peal the foil down and cut into small squares. Store, layered in wax or parchment paper, in the refrigerator. Devour and enjoy!!!


Saturday, December 20, 2014

DIY Thumbprint Necklace

All the thumbprint ornaments and Christmas decorations I've seen lately have led me to think about making a smaller version for a necklace. I love anything that helps me savor and preserve these precious years and moments with my little ones. So, I started researching ideas for thumbprint necklaces. There are lots for sale out there for nearly $150-$200...yikes! But there are also some DIYs out there. We tried a few styles and techniques this week...some were okay, others didn't work out at all, but this one was nearly perfect! Simple and sweet! We modified it a little to make the THUMBPRINT NECKLACE work for us and I just love how they turned out! 


I made one using my thumbprint for L to hang around her neck and we made one using L and WB's thumbprints for myself. (Pssst...we also made a little keepsake for Daddy to keep in his pocket too! L can't wait to give it to him for Christmas this week!)


Materials needed:
-Sculpey, silver (oven-bake clay)
-wax paper
-hardback book
-tiny heart cookie cutter
-letter stamps (optional, though leather printing kits work great!)
-toothpick
-crayons


First, roll and knead the clay until it becomes soft. Finish by rolling it into a ball.


With wax paper underneath the ball and wax paper on top, flatten the ball using a hardback book. Board books work great for these little project...flattens the clay evenly and quickly.


Next, using the cookie cutter, cut out a teeny, tiny heart.


On the backside you can print a name, date or initials using the letter stamps. Of course you could print the word "love" or skip this step altogether. 


Carefully flip the clay over and on the opposite side press your thumbprint onto the heart. With little thumbs, you can carefully press one on each half of the heart as I did with L and WB's. 


Next, poke a hole in the heart with a toothpick. You can place the hole in the middle of the heart, though we chose to put ours to the side. Notice I left one heart without a hole...that's the one we'll give to my husband to keep in his pocket. 


Now to bake! Preheat the oven to 275 degrees. Line a cookie sheet with parchment paper (or foil) and bake the thumbprint hearts for 10 to 15 min. When they come out of the oven, wait a few minutes for them to cool. Sculpey typically hardens completely upon cooling. 


Once the hearts have cooled, you can gently rub a crayon over the thumbprints to make them more visible. I tried using a gold crayon first, but on the silver clay black definitely shows up best! If you made this necklace using white or pearly-colored clay, I think any color would shine through. We may try that next time!


Of course, you can also leave the thumbprint as is, without rubbing crayon over top. Just as sweet if you ask me!


Finish your necklace by adding a jump ring or some wire (as we did) and a chain. L and I are pretty smitten with our new creations! So much love!


Wednesday, December 17, 2014

DIY Peppermint Play Dough

While you escape to the bathtub to enjoy your Candy Cane Sugar Scrub you need something to occupy the kids, right? So, here's my recipe for PEPPERMINT PLAY DOUGH! 


This play dough takes only a few minutes to make, but stored in a gallon-sized bag or an air-tight container, it'll keep for nearly a year! Whenever L has friends or cousins over I love whipping up a batch of play dough...it keeps them happy and busy for at least an hour and I can split the dough in half and send the other kid home with some. This recipe makes plenty for 2 or 3 kids to play with! 


A tip to keep your kids entertained playing with play dough for longer: Start off with plain play dough. Let them play 15 or 20 minutes, then throw some glitter into the mix. Once their attention starts to drift, add some colorful beads or buttons. Add some measuring cups and kitchen utensils, some lil plastic dinosaurs or army men. Just don't give them everything at once, instead add to the play dough in intervals...works every time! 


Ingredients:
2 cups + 1/2 cup flour
1/2 cup salt
2 Tbsp cream of tartar
2 Tbsp vegetable oil
1.5 cups boiling water
food coloring
1/2 - 1 tsp peppermint oil


First, put the water on to boil. Add about 10 drops of red food coloring to the water. As the water is heating up, mix 2 cups of flour, salt and cream of tartar in a large mixing bowl. Then add and mix the vegetable oil into the flour mixture. Once the water is boiling, add it to the bowl and mix with a spatula. The dough will be a sticky mess while warm. Mix it as best you can, then let it cool off. After a few minutes cooling off, sprinkle your working surface with some of the remaining flour. Dump the play dough onto the flour, adding more flour to the top, and knead the dough. Continue working with the dough, adding a bit of flour as needed, til the dough is not sticky anymore and you've reached the desired consistency. Once the play dough is made, fold in the peppermint oil to make a fun smelling PEPPERMINT PLAY DOUGH! Enjoy! 


Tuesday, December 16, 2014

Candy Cane Sugar Scrub

As I was brainstorming the other day, thinking about switching out the honeysuckle oil in my Semisoft Honeysuckle Soap with peppermint oil, it occurred to me that I could try making something new altogether...a sugar scrub! Even better, a peppermint CANDY CANE SUGAR SCRUB! I had never made a sugar scrub before, but I figured it couldn't be too hard and I was right...this one is easy peasy! What a beautiful, fun, tasty-smelling gift to give to friends this holiday season!


Ingredients:
2 cups sugar
1/2 cup olive oil (you could also use coconut or almond oil)
1 tsp peppermint oil
red food coloring
candy cane (optional)

Materials needed:
-2 jars
-spoons
-fork
-rolling pin
-freezer bag
-mixing bowls
-thin cardboard (old cereal box...optional)
-scissors


First, put the 2 cups of sugar in a large bowl and slowing add the olive oil while mixing with a fork. The texture of the sugar scrub should be similar to wet sand. 


Next, add the peppermint oil and mix thoroughly.


Once the sugar scrub smells like a delicious candy cane, divide the sugar scrub and put half of the mixture into a separate bowl. Add about 10 drops of red food coloring to one of the bowls and mix thoroughly. 


Place your candy cane into a freezer bag (either the gallon or quart-size). Crush it finely with a rolling pin. Add the candy cane dust to the red sugar scrub mixture.


Now you have to decide how you'd like your sugar scrub to look in the jar...either a layered, candy cane effect or a peppermint candy swirl.


To make the layered jar, it's pretty self-explanatory...just spoon some white sugar scrub in the jar, pat it down and spoon some of the red sugar scrub on top. Pat that layer down and repeat until the jar is full!


To maker a peppermint swirl, it takes a little more time, but is still rather easy. First, cut the cereal box-cardboard into three equally sized strips. Make sure they all fit across, inside the jar. 


Next, cut about half an inch off the top of one strip. Cut a full inch off another strip. The shortest strip should be the height of the jar, not any shorter. 


Now, with the middle sized strip and the tallest strip, make a vertical cut up the middle of the cardboard, leaving the top half-inch uncut. Place the shortest strip of cardboard inside the jar. Next, slide the mid-sized strip down on top of the shortest one. Follow with the tallest strip. Arrange the cardboard, so the jar is equally divided.


Next, carefully fill each section using a small spoon. Baby spoons work great, but if you don't have one you could always roll some paper into a funnel-shape and use that.


Once the jar is filled and you've gently pressed down on the sugar scrub, very carefully removed the cardboard pieces one at a time. Voila! A peppermint swirl! 


L and I took a shower together this morning to try out our new CANDY CANE SUGAR SCRUB creation...amazing! And fun! The sugar gently exfoliates the skin, leaving it nice and smooth. This sugar scrub smells good enough to eat! 


Enjoy some pampering amidst all the craziness this holiday season!