Showing posts with label fun activities. Show all posts

Thursday, September 17, 2015

DIY Jacob's Ladder Toy

I really wanted to make L a Jacob's Ladder Toy, but didn't want to make a trip to the local hardware or craft store for supplies. So, we made this Jacob's Ladder out of an old board book! (If you don't have a board book they are easy to find at the dollar store.) I just love the outcome! This one is super-colorful compared to the wooden one I had as a kid and is just as much fun!


I loved playing with my Jacob's Ladder when I was young...it's such a unique toy! Flip-flopping it back and forth is very calming, but it also makes you think creatively and problem solve. I enjoyed watching L play with the one we made today...not only was she ecstatic when she finally figured out how to work a Jacob's Ladder, but she was also folding it into shapes, pretending it was a snake, a bracelet and a funky hat.  


Materials needed:
-board book
-3 pieces of ribbon (35 inches long each)
-glue
-box cutter
-paper cutter (optional)
-scissors


First, using a box cutter, disassemble your board book. 


Next, measure the dimensions of one page and decide how best to cut it. The book I used was 7 in x 7 in. I chose to cut the pages down the middle in one direction and into thirds going the other direction. Each piece ended up being 3.5 in x 2.25 in. If you have a paper cutter on hand, it makes this step super quick and easy! I cut up 4 pages, leaving me with 24 pieces.


Once you have 24 pieces cut, sort them into "nice" and "ugly" piles, 12 cards in each pile. The "ugly" cards won't be seen.


Next, glue each "nice" card to an "ugly" card with a thin layer of wood glue. Put some canned food on top of the cards to keep them flat and clamped down for the first few minutes, while the glue is setting. Once they are all glued, let them dry for an hour or two. You should now have 12, double-stacked cards.


Now, time to make that Jacob's Ladder! Lay one card-stack in front of you, "nice" side down. Spread a thin layer of glue on top of the card-stack. Place the ends of all three strips of ribbon onto the card-stack. As you can see in the photos, two of the ribbons spread out into one direction and the other ribbon to the opposite direction. 


Spread a dab of glue on each ribbon end and press another card-stack carefully on top, "nice" side up. 


Fold all the ribbons over the top of the cards and to the opposite direction. Pulling them taut, place another card-stack on top of the ribbons, "nice" side down. 


Spread a thin layer of glue on the card-stack and fold the ribbons over, keeping them pulled taut much as possible. You can press the ribbons down into the glue to hold them in place.


Spread a dab of glue on top of the ribbons, and press another card-stack on top, "nice" side up. 


Folding the ribbons over again, repeat the last three steps, until you reach the last card-stack and the end of your ribbon.


Trim the ribbon, pull it taut, and glue it in between the last two card-stacks. 


Place a can of food on top of the entire Jacob's Ladder Toy and allow the glue to dry completely for an hour or two. 


Now, time to play!!! If you've never used a Jacob's Ladder before, you flip the top card to one side and let gravity do the rest of the work. The card's flip-flop down, one after another, like magic in your own hands!


Enjoy!!!


Wednesday, September 2, 2015

DIY Toy Sail Boat

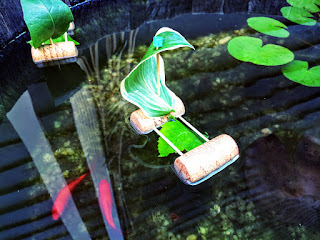
One evening this summer, while we were getting ready for bath time, L pulled a wine cork out of her pocket. She had been saving it all day to float it around and play with in the bath tub. That got me thinking...I knew with a few toothpicks and some leaves we could turn her wine cork into a little sail boat! Leaves work great for this project, because they're naturally water-proof and easily replaceable! 


Materials needed:
-2 wine corks
-4 toothpicks
-2 leaves
-old pencil
-scissors


Take one of the wine corks and stick three toothpicks into it, all pointing in the same direction in a line.


Next, push the second wine cork into the opposite ends of the toothpicks. 


Stick one more toothpick vertically into the middle of one of the corks. 


Find a medium-sized leaf and weave it through the bottom toothpicks. We used a balloon flower leaf. This step isn't necessary, but it makes a nice lil bed for anything you may want to sail on top...a bug, a rock, a fairy friend.


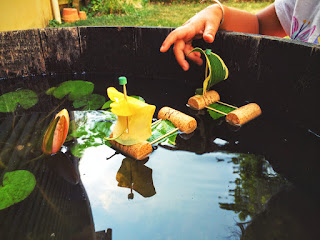
Next, find a slightly larger leaf and thread it onto the vertical toothpick, making a sail. We found the hosta leaves to work best for this, though any thick and sturdy leaf will do! 


To make the sail boat safer for little hands, twist an eraser off the top of an old pencil. Cut it in half with scissors and push it onto the top of the sail. 


Now, time to play! L had hours of fun blowing her boats around our rain barrel! 


The boats may not seem like much, but ours withstood some submarine plunges under the water and lasted through two nights of bath time play! Tomorrow, we'll replace the leaves and keep sailing!


Enjoy!!!

Wednesday, August 26, 2015

Coffee Can Stilts

A few weeks ago a family friend called me up to ask if I had a use for a bunch of old coffee cans. While I was a little afraid to tell my husband that I had said "yes" to accepting such a large bag of junk, taking up more room in our house, I was over-the-moon excited to be acquiring these cans! I knew just what we'd use them for...COFFEE CAN STILTS!!! These are so quick and easy to make and are so much fun for the kids! Walking on stilts is all L wants to do these days!!! "I can almost touch the sky from up here, Mom!"


Materials needed:
-2 coffee cans
-church key can opener
-rope
-scissors
-paint (optional)
-acrylic sealant (optional)


First, if you want your stilts to be colorful, have your little ones paint the cans with acrylic paints. After the paint has dried, spray on a coat of acrylic sealant to give the cans a glossy finish.


Next, using a church key can opener, make two holes on the bottoms of the cans. The holes should be opposite each other. Try to bend the metal all the way back inside the can, so no sharp points protrude out. (Your kids shouldn't have their hands inside the cans at anytime, but you never know when the curious ones may take off the lid while playing and reach inside...so, better safe than sorry!)


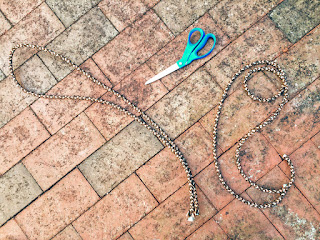
Cut two pieces of rope. To find the correct length, have your kid stand on the rope, holding both ends in his or her hands pulled up to chest-level. This is a good place to cut it. After the stilts are assembled, the rope handles should reach your child's waist. 


Thread the rope into the holes of the can from the outside. Once both ends are pulled through, tie a knot in each end. Repeat on the second can. 


Place the lids back onto the cans and flip them over. Having the lids isn't a necessity, but it may save your floors from being scratched up while your children walk around inside. Now, time to play!!!


As your little ones practice, they'll get better and better at walking on their stilts and they'll be oh-so-proud!!! Future circus performers, anyone?


Talk about good hand-eye-FOOT coordination! Enjoy!!!