Showing posts with label water play. Show all posts

Wednesday, September 2, 2015

DIY Toy Sail Boat

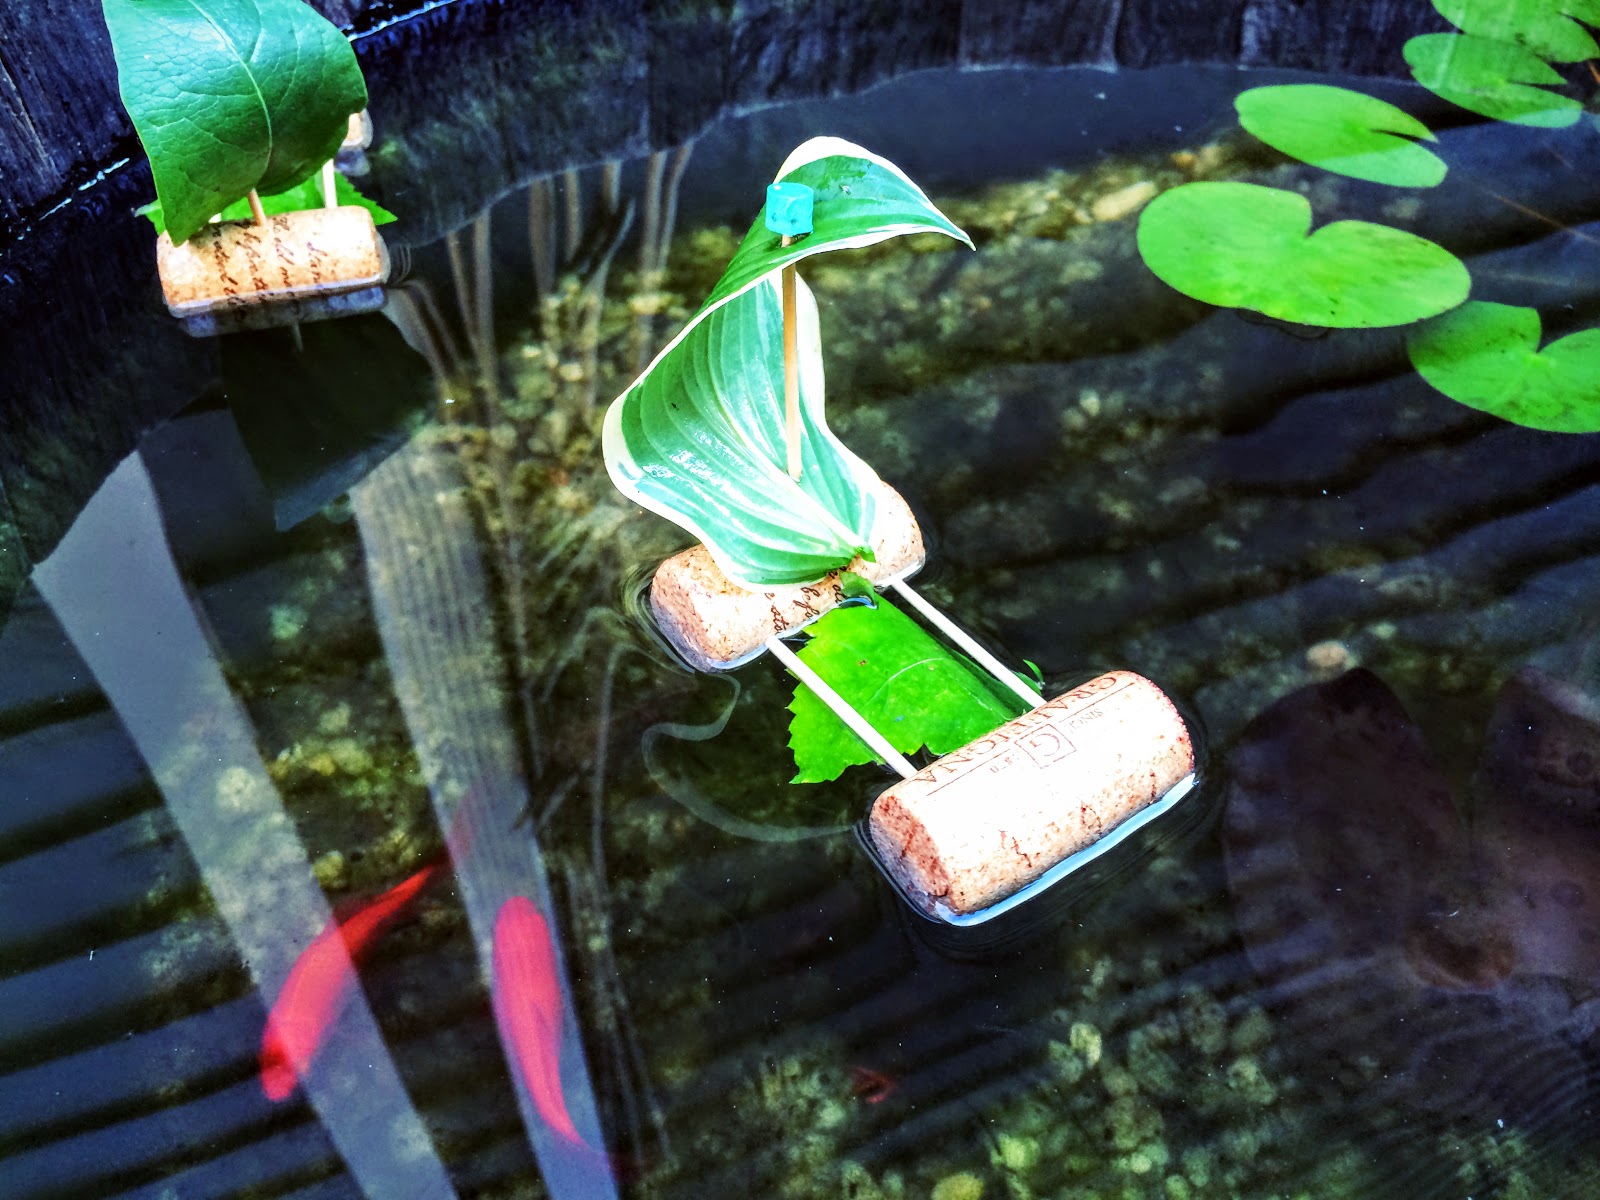
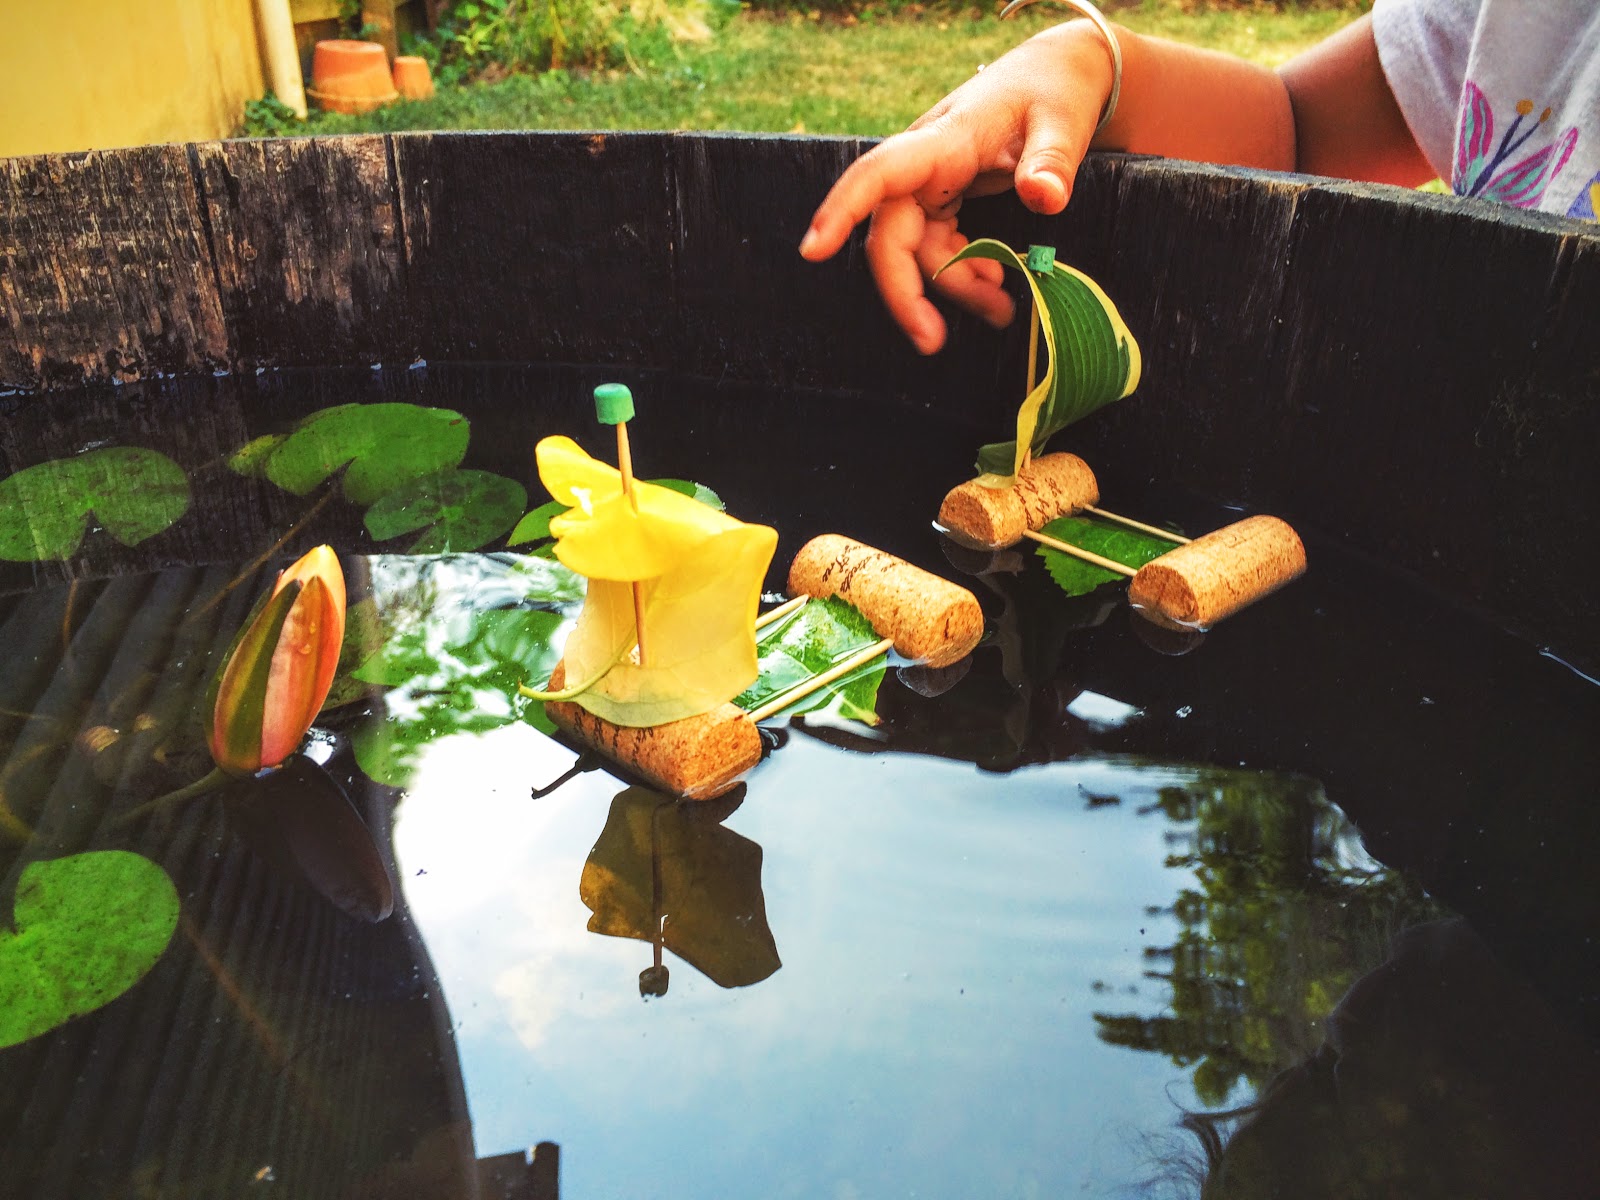
One evening this summer, while we were getting ready for bath time, L pulled a wine cork out of her pocket. She had been saving it all day to float it around and play with in the bath tub. That got me thinking...I knew with a few toothpicks and some leaves we could turn her wine cork into a little sail boat! Leaves work great for this project, because they're naturally water-proof and easily replaceable! 


Materials needed:
-2 wine corks
-4 toothpicks
-2 leaves
-old pencil
-scissors


Take one of the wine corks and stick three toothpicks into it, all pointing in the same direction in a line.


Next, push the second wine cork into the opposite ends of the toothpicks. 


Stick one more toothpick vertically into the middle of one of the corks. 


Find a medium-sized leaf and weave it through the bottom toothpicks. We used a balloon flower leaf. This step isn't necessary, but it makes a nice lil bed for anything you may want to sail on top...a bug, a rock, a fairy friend.


Next, find a slightly larger leaf and thread it onto the vertical toothpick, making a sail. We found the hosta leaves to work best for this, though any thick and sturdy leaf will do! 


To make the sail boat safer for little hands, twist an eraser off the top of an old pencil. Cut it in half with scissors and push it onto the top of the sail. 


Now, time to play! L had hours of fun blowing her boats around our rain barrel! 


The boats may not seem like much, but ours withstood some submarine plunges under the water and lasted through two nights of bath time play! Tomorrow, we'll replace the leaves and keep sailing!


Enjoy!!!

Monday, June 1, 2015

Glow-in-the-Dark Bath

A couple weeks ago L and I walked down the street to check out a kids' festival going on in town. Our favorite part was some "Glow-in-the-Dark Yoga" going on at a local yoga studio. While the kids danced and froze into yoga poses with their glow bracelets on, the skies opened up into a torrential downpour outside. (I thought we'd need a canoe to get home.) Of course L and I embraced mother nature as we danced and splashed the whole way home. Cold and muddy, our next stop was a hot and soapy bath...with the lights off and our glow bracelets still on!!! It was silly, but so cool...I don't know why I never thought of it before! 


While lil ones love the idea of glow sticks, our kids are rarely up late enough to play with them in the dark. Turning the lights off at bath time and adding some glow sticks and glow bracelets to the water is perfect! Glow sticks only cost $1 to $2 dollars for a pack of 5-10.


Many bathrooms don't have windows, so a glow-in-the-dark bath can be done at any time of day. 


Make sure you keep an eye on your children while taking a glow bath, many glow sticks suggest kids be at least 8 years old to play with them. You definitely want to make sure your little teethers keep them out of their mouths! 


You can even add some "glow-in-the-dark bottles" to the mix as well! Enjoy!!!


Thursday, May 28, 2015

DIY Pool Toys / DIY Bath Toys

With the pools opening last weekend and the last day of school yesterday, Summertime is here!!! These are some fun DIY POOL TOYS that take just minutes to make. We like to throw ours around, splat them on the pavement and L likes to soak hers in water, then draw with it on the pavement. If you don't have a pool nearby, just fill up some buckets of water, toss in these fun and funky toys and play a wet and refreshing game of catch in the backyard. So much fun! (Be sure to scroll down to the bottom for some other DIY POOL TOY ideas too!)


Materials needed:
-3 sponges
-1 elastic hair band
-scissors


First, cut the sponges long-ways into 3 equal sections.


Next, stack them up.


And lastly, tie a hair band around the pile. 


Too easy and so much fun!!!


Other fun and easy pool toy ideas? 
A large paintbrush! Your kids will have a blast painting with water on the pool deck or even outside on the sidewalk.


We love playing with these sensory bottles in the water too! Both the "baby sensory bottles" and the "sparkle bottles" are fun to bounce around. They are quick and easy to make and are fantastic pool toys for the little ones!


Tuesday, May 19, 2015

Tin Foil River and DIY Boats

This morning the girls and I went to an awesome, little program for kids where we learned about the waterways in our town and L got to make her own toy boat. When we came home I decided to make our own "waterway" in the backyard with some tin foil. Too easy and so much fun!!! All you need is some aluminum foil, water, and some toy boats to float along! I mean, seriously...who wouldn't like a TIN FOIL RIVER in their yard? 


Boat ideas and links:
-ping-pong balls
-any small items that float, bath toys, etc.


First, decide which direction you'd like your TIN FOIL RIVER to flow. If your yard or driveway is on a slope, it's pretty easy to figure out how to get the water to flow...start at the top and end at the bottom. If you yard is flat, you can prop some of the river up or make it in a donut shape. We decided to make ours interesting, starting the river on the slide, having it flow under a chair, and bend and twist across the yard. 


Making the waterway is pretty simple...you can be a perfectionist about it and try to make all the sides even or just wham-bam make it, play with it. We tore large strips of aluminum foil and double-layered the foil to prevent any leaks. Fold the sides up. At any joints (places where you're attaching two sections of foil) you can add another layer of foil underneath. Same with the end of your river...we tried making our sides a little higher and extra-sturdy at the end. 


If you need to, you can weigh your foil down with some smooth rocks. Makes fun little obstacles too! If a side of your river starts to sag, it's pretty easy to prop it up with a brick or flower pot...whatever you have handy. The TIN FOIL RIVER allows for some terrific problem solving and experimenting with your little ones! I can't wait to see what L comes up with next for our backyard waterway!


Enjoy! 


Monday, April 20, 2015

The Mud Kitchen

Our MUD KITCHEN might just be my favorite kids' project yet! I've been dreaming of building one for L since late last Summer and this Spring we went for it! Collecting things and building it was definitely fun for me...I love scouring antique shops and junk stores with an idea in mind. And now L has a blast playing in her MUD KITCHEN nearly every day! She's always loved digging in her dirt pit, so we set the mud kitchen up right beside it. 


Materials needed:
-old pots and pans, muffin pan, mixing bowls, old tea set
-cooking utensils and/or garden tools
-old rags
-shelving unit
-DIRT!!!


The best places to find things for your MUD KITCHEN are yard sales, flea markets, antique and junk stores. If you find a water-proof set of shelves or little bench, that would work great! We ended up making ours out of some lumber and cinder blocks. L helped sand and paint the wood, I painted two lil burners on the top pieces, and we finished it off with a few coats of polyurethane. I love that L was able to make it her own! 


We found this perfect mirror to attach to the kitchen for only $15 at a local antique store. I wanted a mirror for a bit of a "kitchen window" effect, plus it makes our tiny yard look a bit bigger! It was the only one I could find that had a wooden backing to it...most others were particle board or cardboard. Our mud kitchen is up against our house, a little bit protected by the weather, but when it pours rain the kitchen still gets wet. Make sure everything on your kitchen is more-or-less waterproof. 


Along with the burners I painted on top of the mud kitchen, we also attached two lil knobs (to turn the stove and oven on, of course)! You can find knobs really cheap at your local Habitat for Humanity or at your local hardware store. Since ours were attached to solid wood, I just glued them on with some superglue. So far it's worked great!


On the side of our mud kitchen, we attached two cute lil hooks. Again, we found them at a local antique/junk store for $1. They couldn't be more perfect! L hangs her lil dish rags on there and when she's all done playing with her kitchen each day, I have her clean it up. She brushes the dirt off with a dry rag, follows up with a wet rag, and she puts all her pots and pans away. 


Like many activities like this, my biggest tip to you would be to withhold some of the kitchen supplies, giving your kids a lil more day by day. On the first day I gave L her pot, pan, and mixing bowls. On the second day, we added an empty milk carton, egg carton and vanilla bottle. After that, we threw in a muffin pan and some old silicon muffin cups. I have an old child's tea set I'm saving for a special day as well. Keep things interesting and mix it up! 


Sparkle bottles would be a fun addition to your mud kitchen too! Not to mention, making some potions out there as well. (Tell me I'm not the only one who mixed up "magic potions" with water, dirt, wild onions and herbs as a kid!)


How much would your child LOVE a mud kitchen??? Mmm...mmm...mud pies, mud spaghetti, dirt scrambled eggs, mud muffins...